So I got in my head that I really need to go and shoot several of the really well known locations of natural wonders that we have here in Utah at least before I get told that I can't. So I headed down to Southern Utah, and tried to go to both Dead Horse Point and Arches. I had exactly 4 hours of shooting time and the following is the best of what I came away with. Enjoy.
So here are the things that I learned:
1. Don't try and shoot this much in so little time. People don't like when you tail gate them because you are racing to spot to get a good shot.
2. Moab is a cool little town. People have told me this, but I was skeptical. Lesson learned.
3. Always bring tools. My GoPro locked up on me and I didn't have an allen wrench to take it off the DJI Phantom to reset it.
4. Don't be so scared of flying. I told myself that I was willing to risk the $1,500 to get the good shots, but I held back because of my fear of the wind taking the copter.
5. Always have a good model with you for those people related shots. Or at least carry a model release so you can have strangers fill in for you.
Photo and Video equipment reviews with a little fun thrown in...
Sunday, November 3, 2013
Tuesday, October 1, 2013
Shooting a wedding... prepare, and then be flexible

Here is what I came away with for the video:
Here is the link in case the video doesn't play. http://5d2.smugmug.com/Weddings/Jen-Wedding/i-R8gpQJd/0/1080/JenWeddingCompilation-1080.mp4
Here are the photos:
http://5d2.smugmug.com/Weddings/Jen-Wedding
Things I did right
I brought almost everything that I own, equipment wise.
I made a shot list for all of the "wedding events" so that I knew what was coming, and what was left.
I watch other wedding videos to get ideas.
I made people laugh and got some very good shots.
I didn't settle with good enough shots, I took on complex shots that paid off.
I stayed out of the way. I did my thing, and hopefully was not distracting to the guests.
I got all the shots on my shots list.
Things I did wrong
I left the Zoom H4N on Phantom power, which sucked the batteries dry in minutes, not hours. Lost audio files of the ceremony because of that.
I didn't carry both cameras with me at all times. I should have. I need a belt/holder for second and third cameras.
I didn't start the GoPro because of my fear of running out of battery in the middle of the ceremony, and I didn't have any good spot, or way to mount the camera in trees.
I didn't bring an assistant to hold a reflector or a diffuser.
I didn't set the shutter speed and ISO on some of the inside shots and got harsh shadows. Single flash system does not hold up well with large wedding parties.
I didn't balance the stabilizer to perfection so I had to post stabilize.
I didn't use the jib for the wedding ceremony, to get shots over the crowd standing for the bride entering. Although, this was probably good since I would have had to change the depth of focus and could have really screwed it up.
Things that I learned
In the end, I am happy with what I was able to do. It was worth the hours of planning, the equipment testing. But here are the little things that I learned along the way.
1. Don't try to be the photographer and the videographer. You really need multiple cameras and multiple people shooting to do video well. There are so many angles, and movements that you need to do with video to make it interesting. And of course to capture all the little moments you really need a dedicated photographer. Switching back and forth, and making sure all the settings for the cameras switch as well, is not a good place to be in. It can be done, but I would not recommend it. Also, don't try to shoot anything if you are suppose to be in it.
2. Don't let the batteries run out on a Zoom H4N while recording. If you do, take out the card and put a new card in so that you have a chance of recovering what you did record. There is a good chance you can, but not if you replace the batteries and continue recording to the same card. Don't leave phantom power on, if you aren't using a powered condenser mic. I had the Sennheiser G3 wireless mics that don't need phantom power, and I left it on and got maybe 30 minutes of record time.
3. Learn how to make people laugh. People are usually pretty solemn at weddings, but if you bring out the joy, however you can, you will be remembered and you will get shots that look like people are really glad to be there.
4. Plan ahead as much as possible. Get there early, and if possible, go there before hand to scout out the great locations for shots. If you are looking for good spots while people are waiting for you, they will get bored and frustrated.
5. Learn how to direct people to do what you want. Chin down, turn to your left, step forward need to be direct and assertive. For those few moments, you are the boss and you can't be timid about asking for what you want. This does mean that you have to do it in a way that stops people relaxed and happy. Don't be a photo Nazi. Be a stewardess on a first class flight to Hawaii. Happy people make better photos and video.
6. Don't waste people's time trying to get your camera to work. You should take a test shot as people are gathering for you, check the settings to make sure you know what is best for the situation, and then shoot. Talk to people while you are shooting so that they have some feedback. If you are stuck staring at the back of your camera, or spending time adjusting things, people will get bored and not listen.
7. With large groups of people, take lots of shots. If there are kids in the shot, don't try to hard to make them look at you, chances are that if you are being entertaining to the group, the kids will look as well. So catch them when they do by taking more shots. If you are any good with Photoshop, you will be able to edit the perfect shot with a composite of multiple shots.
8. Make sure you set expectations up front. Shooting is about 1/6 the battle. Remember that for every good picture, I spend about 10 minutes per photo. From every 1 minute of good video, I spend about 6 minutes of editing. So, why does that matter? Because you want to set expectations about what it will take before someone is going to get your final product(s).
Sunday, September 22, 2013
Canon 5D Mark III with Magic Lantern In-depth review
Hi all, Dave here. For a very informative and very helpful review for anyone looking at the decision to buy the Canon EOS 5D Mark III camera, watch the video.
For those that like to read, here is a summary text of the review.
Reasons why I was looking at the 5D Mark III to replace my 7D.
1. Moire and poor anti-aliasing.
2. Lens purchase decisions fork in the road (crop vs full frame)
Compared to the 7D, the 5D Mark III is better at everything, higher quality build, built for video, full HDMI out. Then came the 6D, full frame. Mega pixels, focus, no headphone jack, but GPS, Wifi, didn't have the video quality of the 5D Mark III.
Compared to 5D Mark III and the Cinema series C300, C500 to get to 4K $$$ and missing features
And then came Magic Lantern video raw...
-24fps 14bit raw video that blows away 8bit compressed video and competes with RED at least at 1080P
-Promise of even better future... MLV format, ISO less HDR video (14 stops of dynamic range), compressed RAW, Sound, stabilized features/bugs
Things I love about the 5D Mark III
Camera features:
-focus speed, FPS photos, auto-focus settings
-no aliasing, no moire,
-sensor is better, beautiful photos,
-less noise at high ISO
-600EX flash, High speed sync,
Magic Lantern features:
-video quality
-color depth 14bit amazing dynamic range ,
-focus peaking,
-zoom, mixed with 70-200 IS II L, amazing 600mm Zoomed video at F2.8
-intravalometer,
-histogram,
-scopes,
-advanced bracketing,
Things you will have to live with...
It is not perfect... yet.
- Setup/install/update of Magic Lantern not for the weak (hard to find and know the instructions are correct)
- Upgrades fixed pink frames but removed audio
- Raw video post processing steps/time (Rawanizer -> After Effects/Camera Raw-> Premiere)
- No audio sync, all separate and external (Zoom H4N)
- Sometimes flaky (video recording errors, pink frames, slow to start recording)
- 11 minutes of video per 64GB better know what you want and not waste time rolling
- Shooting Raw video in full hot sun temp issues
Is it worth it...
- Resounding YES! For the price and the quality and features, YES, you would have to spend $$$$$ on RED + accessories to get the quality with not all of the features (no photos), or double on Black Magic Cinema and get a cropped lens coverage with less features (no photos).
Accessories that you have to have:
- A video editing capable computer to process the Raw video
- Komputerbay 64GB(1000x) $120 or 256GB (1200x) $600
- CarrySpeed VF-3 (used to see live video focus peaking)
- Zoom H4N, H1, H6 (Quality sound recording)
- Tripod with a Fluid head for smooth video pans
Monday, September 9, 2013
Huge price drop ($200) on the DJI Phantom over at Dronefly.com
---BREAKING NEWS--- DJI Phantom price drop

If you are interested in getting into the fun of flying your GoPro Hero 3 using a quadcopter, now is the time. Dronefly has dropped the price of the DJI Phantom down to $479.00 (from $679.00) That means that you can get the whole package, DJI Phantom ($479.00), DJI Zenmuse Gimbal (still $679.00), and GoPro Hero 3 Black (now $329.00) for a total of $1487.00. Of course you will still need extra batteries, extra props, and other accessories but this is huge. I have worked with the guys over at Dronefly and they are great guys who go above and beyond to help all their customers. Tell them that David Watson sent you.
This amazing quadcopter is so easy to fly and easy to get amazing HD aerial film. It is so easy to fly that even a child could do it! Here is some of the amazing video that I have shot with this great combination.
Wednesday, September 4, 2013
Fire dancers in video raw
Hi all, I had the chance to attend the Luau at Thanksgiving Point this year. It was my first time. I gotta say, it was fun! When I got there, I was thinking that parking was going to be a nightmare. It wasn't. Smooth as silk, easy in, easy out. After parking, the line for getting in was at least a quarter mile long. I got in line thinking that I didn't even know if they were going to be sold out, or worse, run out of food. But the line moved pretty fast and I got in pretty quickly. The lines for food were fairly robust, but the cater company was keeping up nicely. I waited until most people got their food before getting mine, it gave me time to walk the gardens a bit and shoot some video.
If you haven't been to Thanksgiving Point Gardens, or if you are like me and thought that the gardens were just in back of the shops, first of all you would be wrong, and second, you really need to see this place. It is tucked away just to the north of the golf course clubhouse. It is HUGE! It will take you a couple of hours to walk around this place. There are waterfalls (and they are not tiny), streams, hills, and the flowers of every variety and breed, all manicured and on display. Seriously, you couldn't find a more amazing place hold, and to shoot, any type of event.
You see, if you take a camera into the gardens, it will cost you a photography fee of $100.00. You can bring 2 people with you but anyone beyond that has to pay $10.00. If you just want to walk around and take pictures with your iPhone, only $10.00. The luau cost $21 for entry and food. So, I figured if I was able to go to the luau, and take pictures with my equipment, I was saving myself 100 bucks. Turned out I was right. I brought everything but the quadcopter, which would have been cool... but after the latest news report of someone crashing into a crowd of people, I think it might be best to stay away from formal crowds of people.
So I shot some with the Canon 7D (16-35L II), and most of the Luau entertainment with the Canon 5D Mark III (70-200L IS II) using Magic Lantern Raw video. Take a look.
Sunday, September 1, 2013
Wild Tarantula crossing... up close and personal
So another day out looking for amazing video... Today's venture took me to the west side of Utah Lake. A long stretch of two lane highway with shooting ranges and beautiful views of the mountains all around. I haven't been out there since I use to ride my bullet bike at speeds faster than I should have. The weather was stormy, but not a bit of wind. Perfect conditions to fly the DJI Phantom quadcopter. I flew around for while, trying to capture some the beautiful light that was shooting through the clouds. Got some footage.
It wasn't until the ride back that things got interesting. It was about 7'oclock when I saw something on the road from quite a distance. As I came by and passed it, I realized that this thing was a big tarantula! I flipped my car around and drove back to find this guy hanging out in the middle of the road. I grabbed the camera and went to get up close and personal with him. I realized that this guy was not going to move, despite the danger of staying in the road. I grabbed a stick and helped him along to get out of harms way. Luckily all the cars that passed stayed out of the lane and he safely made it to the other side. I got back in my car and started driving home again. I wasn't another mile later that I saw yet another one! I decided that I wouldn't go back this time and kept going. Another 1/2 mile, and another one and this one was even bigger than the last two. I stopped and got the camera, and the tripod and got right up in this ones face. Wow, what a face. These creatures are amazing. They are so tall when they stand up and get all defensive. So I got some good video of that one and set off again. I saw 3 more on the road. I knew that we had tarantula's here in Utah, but I had no idea where they were, or how many there must be. Scary!
So here is the video. I added some of the flight video as to not scare you too badly. Watch in 1080p if you aren't scared at all.
As always, this was shot with Canon 5D Mark III, Magic Lantern Video Raw (14bit), 24fps, DJI Phantom with GoPro Hero 3 attached to Zenmuse H3-2D, 1080P 48fps and color corrected in Adobe Premiere.
Saturday, August 31, 2013
BYU Football opening game... oops, wrong stadium
So I am officially dumb. I drove to Provo today thinking that the first BYU football game was today. About half way there I realized that there was not nearly enough traffic on the road and finally checked with Siri. Turns out that the are opening against Virginia, in Virginia. Well, I decided to practice shooting the with the DJI Phantom quadcopter anyway. So here is a short segment of flying around at the empty BYU Stadium on BYU's 2013 opening game. Hope you enjoy...
So I freaked out a bit when I saw jello (warpy movement) in the video. When I got home I thought that maybe I had screwed up the props and needed to re-balance them. Well, after checking the props, turns out that one of the rubber grommets had disconnected, so the video didn't turn out as good as it should have.
So I freaked out a bit when I saw jello (warpy movement) in the video. When I got home I thought that maybe I had screwed up the props and needed to re-balance them. Well, after checking the props, turns out that one of the rubber grommets had disconnected, so the video didn't turn out as good as it should have.
Friday, August 30, 2013
Ice Hockey at Seven Peaks Ice Arena
Hi all. Yesterday I invited myself to a hockey game that my daughter's-boyfriend's-friend plays in. It is a C-league team called the Mudds. As you can probably tell I am trying to learn about shooting video and want to try and get better at it. I decided to once again shoot with the 5D Mark III, Magic Lantern Raw (of course) and the Canon 70-200 F2.8 L II lens. I gotta say, this lens never ceases to amaze. The stabilization that the lens has makes it really great for video.
So here is what I learned. Following a puck and keeping everything in focus is hard to do... and I thought football was hard! I started out really getting up-close and personal with the zoom, mostly keeping everything at F2.8 and ISO 100. I ended up, near the end of the game, shooting at F8 and ISO 1600 and keeping the zoom to a minimum. Oh, I also ended up mounting a GoPro Hero 3 above the goal to catch the action. I shot it at 1080P, 48fps, Spot metering: Off, Protune On. This is because when I merge the footage of GoPro and the Canon it looks much better to have matching frame rates. I know that people will tell you that Adobe Premiere can handle different frame rates, and it can, it just ends up skipping frames. For me, this ends up looking jerky and not good. The 48fps makes it so I can slow the action down for those really cool instant replay action shots.
I also asked the people running the place if I might be able to fly the quadcopter above a game. They said "maybe... let me get back to you", so at least it wan't an outright "no". I think I would have to have FPV googles to pull it off though. It would be fairly hard to follow the action without seeing what the camera is seeing.
Here is the video.
I also took some stills. Stills are what this camera is really meant to be able to do. And it truly does!

Gooooooooaaaaaaaalllll

Pads, who needs pads.

You talking to me?

Nice save
Sunday, August 25, 2013
Sundance ski resort... a little piece of heaven
Hi all. One of the most amazing places here in Utah is Sundance ski resort. It is about 15 minutes up Provo Canyon. My family try to make it at least a few times a year to see the sites and take in the fall colors. While the leaves haven't changed yet, I could definitely see signs of colors coming. (photos of last year below)
While they don't have any cool amusement types of rides like Park City, they do have amazing scenery, food, drinks, biking, hiking, and just about anything outdoors that you could want. They also do weddings, company parties, family get-togethers and everything in between. They also keep the ski lift running to take people up on top of the mountains! Some of the hikes that they recommend also start at the top of the mountain. Even if you are just looking for a little refreshment while traveling in the area, Sundance is great place to stop in for a treat.
I gotta say, I have been kicked out of a lot of places trying to shoot some aerial shots with the quadcopter. Some really stupid places that had no real reason other than just "no". I was approached by a security guard at Sundance and I thought for sure that this was going to be just another "no" type of place... To my utter surprise, he actually pointed me to a open area that I could use and film to my hearts desire. He not only said "YES", but helped me out! Awesome place, awesome staff. Thank you for your hospitality Sundance!

click for high res version
Saturday, August 24, 2013
A little football anyone??? Lone Peak vs. Bountiful and the dynamic camera combo
Bountiful High School vs Lone Peak High School
Hello blogger readers. Today I did some testing of the Canon 5D Mark III with Magic Lantern software installed shooting a high school football game. I am going to be shooting a professional lacrosse game in a couple weeks and I wanted to test out the 70-200 F2.8 IS II mixed with high action and fast moving sports. We all know that this lens and this body are amazing at sports photography... but what about video? Can this dynamic combo really hold it's own when shooting video? Well, I think it can, but can I. Well, after looking at the footage, I need to get a lot better at controlling the focus and don't let people stand in front of me during big plays. Other than that, I am amazed what this combination can do. I'll keep trying to learn and get better to be worthy of this camera.
Congrats to the Lone Peak football team, they won 32-14!
As always, watch at 1080p... it's the gear icon, just below the video.
Congrats to the Lone Peak football team, they won 32-14!
As always, watch at 1080p... it's the gear icon, just below the video.
Here are some photos from the game...


Wednesday, August 21, 2013
Timelapse of clouds... what you don't see with the naked eye
Hi all. I spent some time yesterday taking some up close and personal video of the amazing clouds that are going on here in the Wasatch Front. Luckily, I still had A's lens... the amazing 70-200, mixed with the 3x Zoom factor that Magic Lantern allows for in RAW mode. It turns this lens into a 600mm lens at F2.8. I let it run for quite a while to capture all of the movement and beautiful billowing that is amazing to watch... especially when you then speed it up in post. You could do individual frames like a nighttime timelapse but it is so much easier to change the video frame rate to a slow speed (5fps) and just let the camera capture each fully raw frame. Take a look and tell me what you think.
Sunday, August 18, 2013
Wild Buffalo on Antelope Island...how close is too close?
Hey everyone. Take a look at wild buffalo on Antelope Island up-close-and-personal that I shot on Saturday. It was an amazing day. As I pulled across the causeway, the water was as still as a millpond. No wind at all. But then 3 minutes later, the wind picked up to about 40 Mph. Needless to say, I didn't get any aerial shots but I did get some amazing shots of the wildlife. There is one shot where the buffalo walked across the road about 15 feet in front of me. Didn't need a telephoto lens for that shot! Enjoy
If you want to see more, check out my Youtube channel at http://www.youtube.com/user/dbrentwatson?feature=watch for reviews, and amazing video.
If you want to see more, check out my Youtube channel at http://www.youtube.com/user/dbrentwatson?feature=watch for reviews, and amazing video.
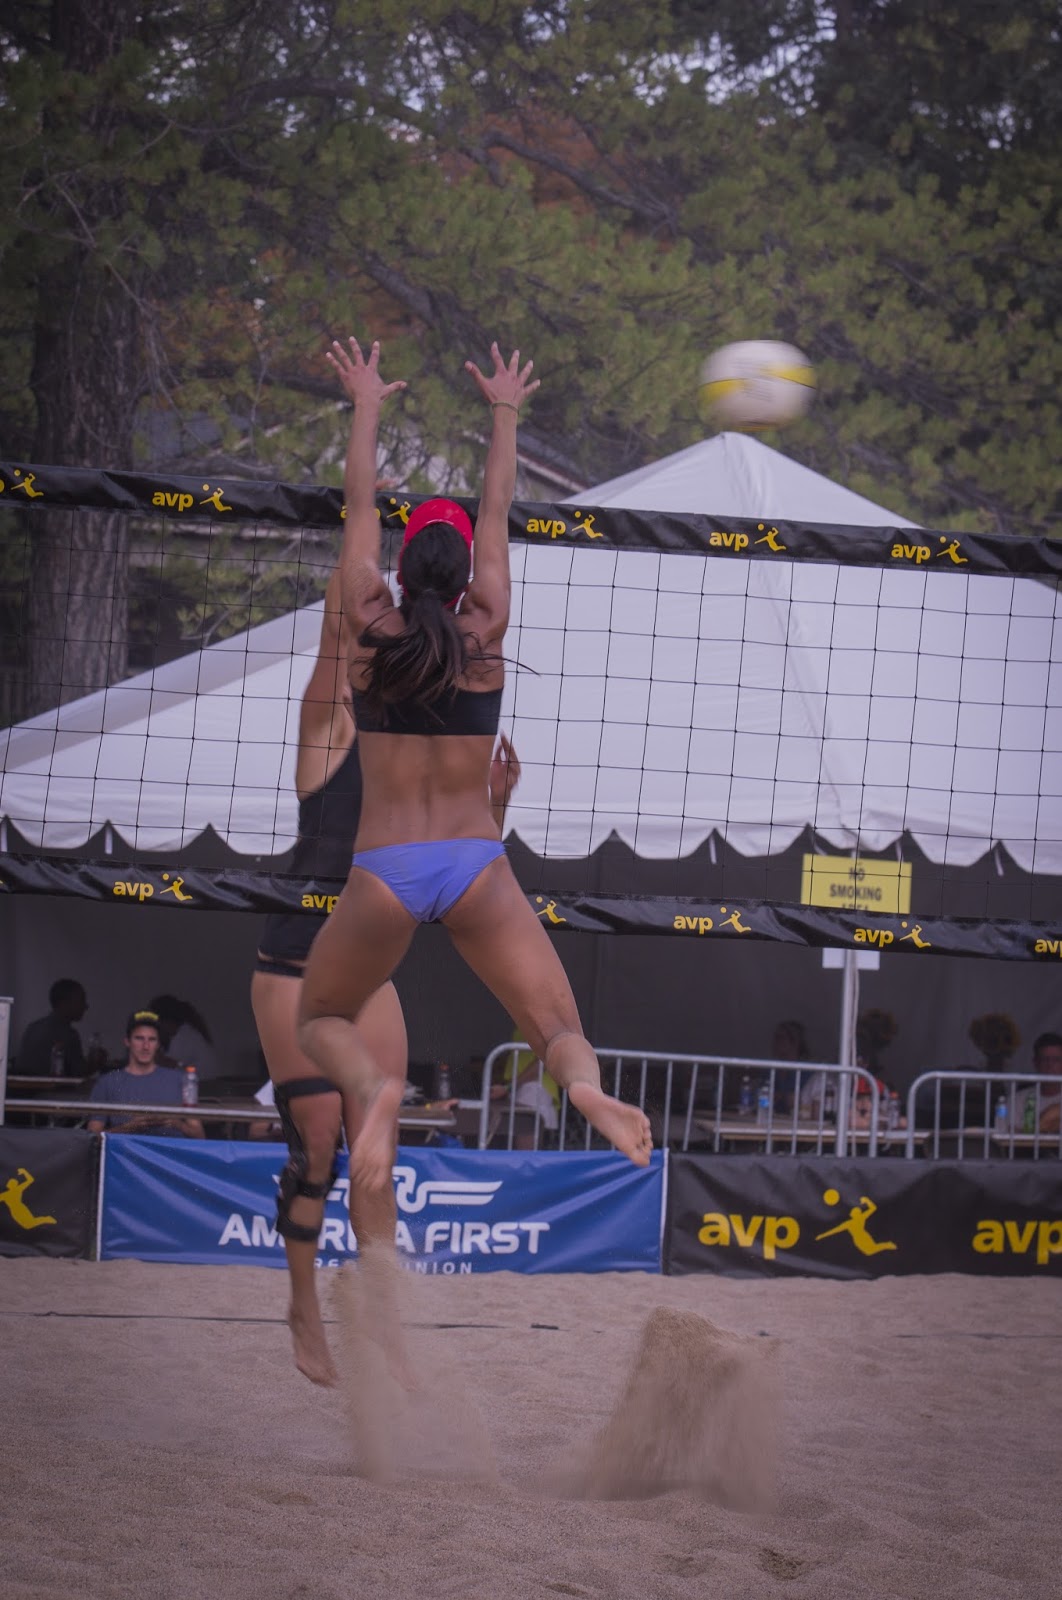
AVP womens volleyball... fun, sun, sand, what more could you ask for?
As promised, here is the video compilation of yesterday's tournament up in Liberty Park, in Salt Lake City. AVP knows how to put in all together. Up close and personal with the fans, it was quite a day of beach volleyball. Enjoy Kerri Walsh Jennings in full HD quality. Music by yours truly. ESPN and CBS Sports Channel were both doing full coverage. It was also very cool that they let everyone in with great cameras, (including myself). I saw several people with full amazing camera rigs. One guy even had a slider on a tripod. I hope everyone got some great shots! Here are mine put together in a nice package.
For more videos, subscribe, if you like.
Thanks to A Palmer for the beautiful 70-200 F2.8 II lens that he let me borrow.
For more videos, subscribe, if you like.
Thanks to A Palmer for the beautiful 70-200 F2.8 II lens that he let me borrow.
Saturday, August 17, 2013
AVP womens volleyball semi-finals in SLC
So I saw the news last night about how some local women got to take on Kerri Walsh Jennings. For those of you who don't know Kerri, she was half of the Misty May and Kerri Walsh Jennings duo from the summer Olympics. Together they have won gold in 3 Olympics. So today, I stopped by Liberty Park in SLC to check out a few matches. Amazing play.
So here are a few shots from the games that were played.


 Some beautiful RAW video to follow!
So here are a few shots from the games that were played.


If you like it, share it!
Friday, August 16, 2013
Where to shoot photos in American Fork
There is a little known secret about this amazing hidden park here in American Fork. Surrounded by trees, you can't really see it from any road, but step inside and you will find one of the most amazing locations for shooting portraits and video. You have colorful rocks and stairs in the amphitheater, and then flowers and hills that make this place large enough for a huge wedding, and small enough to feel intimately close to nature. Just up the hill (as you will see in the video) is the American Fork LDS Temple. Enjoy some amazing flowers video and hidden gems in the park.
Shot with Canon 5D Mark III
Magic Lantern Firmware July 27, 2013 build
Canon 24-70 F2.8 L
ProAm DVC200 8 ft Camera Jib
Music by David Watson
Shot with Canon 5D Mark III
Magic Lantern Firmware July 27, 2013 build
Canon 24-70 F2.8 L
ProAm DVC200 8 ft Camera Jib
Music by David Watson
GoPro firmware update (07/29/2013) lowers the bitrate (quality) on Sandisk microSD cards

So if you have had a GoPro Hero 3 Black edition camera, chances are that you have probably had some problems with it. Lockups, auto-turn-off-while-recording that were a pain to live with. So every firmware becomes a fingers crossed experience. Well, things have gotten better. But this update, has a little fine print that may effect you in a very negative way, and you wouldn't even know it. It is listed under feature enhancements.. Here is the exact text from GoPro.
Feature Enhancements:
- Optimizes compatibility with select microSD cards by reducing data stream rate to 35Mb/sec while recording in 4K, 2.7K and Protune™ modes (HERO3: Black Edition only)
Sounds like they are doing you a favor, optimizing and all. Unfortunately, if you have a Sandisk microSD card (like me), you just got royally screwed (or helped?). Sounds like they ran some tests and found out that Sandisk micro SD cards aren't up to the task of recording at the bitrates that are really required for 2.7K, 4K, and they fail to mention, 1080P 60fps!
So after installing the firmware update, my Sandisk card records at 29Mbps for 1080P 60fps and 32Mbps for 2.7K. So, I took a look at video that I shot before the update and sure enough, it was recording at 45Mbps for 1080P 60fps and 50Mbps for 2.7K. Wow, I mean wow that is drop in bitrate quality by 33%!
So, if you are like me, you are going to want to upgrade your microSD card if you plan on continuing to shoot and get the quality level that you were expecting. I upgraded to the SAMSUNG 64GB Pro version that is listed as a "supported" card on GoPro's website. You can find the list of compatible cards here. And I am now back in business with the fast bit rates at 50 Mbps. Scary reports of GoPro frying cards though.

On a side note, I didn't notice before upgrade so I am thinking that this is also new with this version. RAW white balance? Anyone out there know if that was already available in a previous update and I just missed it? I tried it out and I gotta say that I like it a lot.
Thursday, August 15, 2013
HD Video of flying over Main Street Park City Utah...
Hi all. Over the weekend I headed up to Park City, a high class mountain town here in Utah. Park City is mostly known for the Sundance Film festival, It is where all the movies stars come to debut their indie film works or just party with those who do. It's a beautiful place in winter and in summer. Here is some of the video, shot with the DJI Phantom Quadcopter and the Canon 5D Mark III, Raw. Enjoy.
Music by David Watson
This time out I was more nervous flying than I have every been thus far. The reason I think is because I have been kicked out of many places (i.e. Temple grounds, Football fields, Shopping centers) and there happen to be a cop just down the street that was blocking traffic while they cleaned up a street festival down the road. But, to my amazement, no one kicked me out, in fact, there were really just lots of people oooing and awing over the spectacle of the quadcopter.
This thing is a young boys and old men magnet. I kid you not, if anyone is near, they flock to it like nothing else. Young boys always ask 2 questions; "Where did you get that?" and "Can I fly it?" Old men ask; "What is that called?" and "Does it have a camera?"
I have made a lot of friends and contacts by just flying. It is a lot of fun. Send me a comment and tell me what you think.
Sunday, August 11, 2013
How to shoot the Milky way in a time-lapse, it's harder and easier than you think
Hi everyone. I searched and search the internet for good information about how to shoot a time lapse of the milky way, surprisingly, I didn't find a whole lot of useful information. Sure people are willing to share the settings on the camera, but to find the secrets of where to shoot, and how to shoot.
The next thing to check is the weather, check it here. Make sure you check the cloud cover and the movement of the clouds at least a few hours before you go out somewhere. You need the sky to be clear and you also need to know how much wind. The reason for this is not only clouds, but the wind can kick up a lot of dust. If there is a storm front coming in, chances are pretty good that along with that storm will kick up dust.
Ever here of light pollution? Most of the time, if you live near any sort of city, you are going to have light pollution. This is caused by all the lights that we keep on at night that end up reflecting and bouncing all over the place. To find a place near you that has a dark enough sky, search here.
Ok, now we need to talk about equipment. You need a camera, preferably a DSLR, with the ability to shoot long exposures. How long? 10-30 seconds. Most DSLR cameras can shoot up to 30 second shots in any mode. You also need a wide angle lens. The reason for this is because stars move. If you zoom into a part of the sky, that smaller location will move more than looking at a whole lot of the sky with a wide angle lens. You need a tripod and it needs to be stable. The next thing is a intervalometer. This is a device that will take a series of pictures at a specific interval. I use Magic Lantern firmware which puts this capability in the camera.
That's it really. There are lots of other equipment that can be used, but you don't need those things to take a good timelapse.
So I followed the steps above and this is location that I came up with:

It was far enough away to get out of most of the light pollution for my area and away from any traffic and close enough to drive within a couple hours. The moon rise was 10:00 am so I didn't have to worry about the moon getting in the way, and the weather was mostly clear. Because this is a timing thing that only happens every once in a while, I was willing to risk having a few scattered clouds.
I set the camera up, pointed at the horizon, and manually focus the camera. Focus can be the most tricky part of setting up. I usually end up turning on video mode, or live preview, and then pointing the camera at a star that is bright, and then manually adjusting focus so that the star is focused. You may have to increase the ISO settings to above 3200 in order to really have the camera be able to "see" the stars. If the stars are not bright enough, then you may have to resort to pointing at a man made light out in the distance to set the focus.
Next thing to setup is you camera settings. Here are the ranges that you will want to test with:
Camera Manual mode
Lens: Turn off Autofocus
Lens width: 11mm - 24mm (depends on crop or full frame camera)
ISO: 1600-6400
Shutter speed: 10-30 seconds
Aperture: F2.8 - F5.6
Intervalometer: Every 1-10 seconds (depends on how fast the shutter speed is)
Set the picture style to Faithful
Set the White Balance to 3200 K. Do not leave it on Auto White Balance.
So take some test shots. Keep the ISO as low as you can, but capture as much light as you possibly can. Try ISO at 1600, Shutter speed at 25 seconds. In the camera preview mode, just remember that in really dark environments that the screen will look a lot brighter than the actual photo (or video frame).
Obviously keeping the camera still is assumed. If you have a lot of wind, you may want to make sure that you tripod is sufficiently weighted down to resist any movement.
That's it for the shooting part. In my next blog post I will go over how to process the frames into a video.
My guide to shooting night time time-lapse
There are several things that have to come together before you try to go out and shoot. The first is the phase of the moon. You need the moon to not be out. You can check the sunrise and sunset of the moon by your location at this site.The next thing to check is the weather, check it here. Make sure you check the cloud cover and the movement of the clouds at least a few hours before you go out somewhere. You need the sky to be clear and you also need to know how much wind. The reason for this is not only clouds, but the wind can kick up a lot of dust. If there is a storm front coming in, chances are pretty good that along with that storm will kick up dust.
Ever here of light pollution? Most of the time, if you live near any sort of city, you are going to have light pollution. This is caused by all the lights that we keep on at night that end up reflecting and bouncing all over the place. To find a place near you that has a dark enough sky, search here.
Ok, now we need to talk about equipment. You need a camera, preferably a DSLR, with the ability to shoot long exposures. How long? 10-30 seconds. Most DSLR cameras can shoot up to 30 second shots in any mode. You also need a wide angle lens. The reason for this is because stars move. If you zoom into a part of the sky, that smaller location will move more than looking at a whole lot of the sky with a wide angle lens. You need a tripod and it needs to be stable. The next thing is a intervalometer. This is a device that will take a series of pictures at a specific interval. I use Magic Lantern firmware which puts this capability in the camera.
That's it really. There are lots of other equipment that can be used, but you don't need those things to take a good timelapse.
So I followed the steps above and this is location that I came up with:

It was far enough away to get out of most of the light pollution for my area and away from any traffic and close enough to drive within a couple hours. The moon rise was 10:00 am so I didn't have to worry about the moon getting in the way, and the weather was mostly clear. Because this is a timing thing that only happens every once in a while, I was willing to risk having a few scattered clouds.
Setting up
You need to find a location that has some amount of the earth in the shot. You need this because without reference to something on the ground, it is hard for anyone watching to really see the amount of movement that is going on. Also, because you are going to be shooting at a large aperture value (i.e. 2.8), you need to make sure that anything that is closer to you (like trees or bushes), isn't so close that you lose focus on the stars because of the depth of field. Some of the more advanced shooters will increase the F-stop to allow for a larger depth-of-field to allow for this very thing. You will then have to either increase the ISO, of increase the shutter speed to account for this.I set the camera up, pointed at the horizon, and manually focus the camera. Focus can be the most tricky part of setting up. I usually end up turning on video mode, or live preview, and then pointing the camera at a star that is bright, and then manually adjusting focus so that the star is focused. You may have to increase the ISO settings to above 3200 in order to really have the camera be able to "see" the stars. If the stars are not bright enough, then you may have to resort to pointing at a man made light out in the distance to set the focus.
Next thing to setup is you camera settings. Here are the ranges that you will want to test with:
Camera Manual mode
Lens: Turn off Autofocus
Lens width: 11mm - 24mm (depends on crop or full frame camera)
ISO: 1600-6400
Shutter speed: 10-30 seconds
Aperture: F2.8 - F5.6
Intervalometer: Every 1-10 seconds (depends on how fast the shutter speed is)
Set the picture style to Faithful
Set the White Balance to 3200 K. Do not leave it on Auto White Balance.
So take some test shots. Keep the ISO as low as you can, but capture as much light as you possibly can. Try ISO at 1600, Shutter speed at 25 seconds. In the camera preview mode, just remember that in really dark environments that the screen will look a lot brighter than the actual photo (or video frame).
Taking the sequence of shots
So now set the Intervalometer to take a picture every (shutter speed) + 1 second. The length of the video will depend on how many shots you take. Remember that every frame is only 1/24th or 1/30th of a second in video. So for a 10 second video, you need 240 shots. If you are taking 2 shots a minute, you need to shoot roughly 2 hours worth of shots. This also may depend on the capabilities of your camera, but most should be able to handle it. If you are using Magic Lantern on a Canon camera, this will work. I have tried using long exposure noise reduction and because it take quite a bit of time to process each frame in camera, I don't recommend it. You can do better noise reduction in post.
Obviously keeping the camera still is assumed. If you have a lot of wind, you may want to make sure that you tripod is sufficiently weighted down to resist any movement.
That's it for the shooting part. In my next blog post I will go over how to process the frames into a video.
Wednesday, August 7, 2013
Provo Temple at night - but in the air?
So I went out in search of good video and photos tonight here in Utah County. It wasn't easy... Lots of wind and dark clouds. I stopped off and one of the iconic temples here, the Provo LDS Temple. There were two lovers sitting on the grass, as there always is above the temple. I must have scared them away because they left as soon as I started flying above them. I put the GoPro into timelapse mode in order to capture this photo. It was one of the only photos that stayed still long enough (.3 sec) to look good. Let me know what you think?

Shot with the DJI Phantom Quadcopter with Zenmuse H3-2D Gimbal
GoPro Hero 3 - Timelapse mode (every 1 sec)
F2.8 at .3 sec

Shot with the DJI Phantom Quadcopter with Zenmuse H3-2D Gimbal
GoPro Hero 3 - Timelapse mode (every 1 sec)
F2.8 at .3 sec
Tuesday, August 6, 2013
Sunset in American Fork - from the air
Hi everyone, just thought I would share some great shots that I got flying over American Fork tonight at Sunset. I set the GoPro in time-lapse mode just to see what quality shots I could get from the stills from the DJI Phantom quadcopter. Out of the 400 shots it took, I was surprised to see that most were in focus and some were amazing.


Towards Lehi, Utah Aug 6, 2013

Back towards Mt. Timpanogos and American Fork Utah, Aug 6, 2013
Night time time-lapse - the Milky Way over Utah
I got the chance to head out to the west desert to shoot a night time time-lapse a couple of days ago. I gathered a series of sweet and salty treats at 7-eleven and headed out at around 12:30. I knew I had to get away from the metro areas as much as possible and I also checked the weather reports pretty closely to see if I had enough of a window to stay away from as many clouds as possible. It took a bit of driving, getting lost for a bit, and then finally pulling off the main road a mile or so to a perfect spot. I set up the camera and started to get the right angles and focus. Setting focus is not easy to do. I used my Canon 5D Mark III and the 16-35 L II lens. Other than the few clouds that fluttered on by, it was great. Amazing how short 3 hours looks over time. If you watch it in HD, you should be able to spot about 5 satellites going over. There were also several shooting starts but those end up as streaks in usually only 1 frame so they are harder to spot. Enjoy the show!
American Fork Steel Days - Parade and Festivities
Monday, August 5, 2013
Cascade Springs - Utah Mountains Video Shoot
I spent last Friday shooting the beautiful mountains of Utah. Traveling up American Fork Canyon, over the Alpine Loop, there are a couple of amazing reservoirs and an amazing mountain spring called Cascade Springs. If you are ever in the area, you should visit here. You can also stop by the famous Sundance Ski Resort for some fine dinning any time of year. Enjoy.
I shot with my Canon 5D Mark III, with Magic Lantern Video RAW. The dynamic range is amazing! Should have brought my variable ND filter along to slow some of the water shots but otherwise it was very exciting.
I shot with my Canon 5D Mark III, with Magic Lantern Video RAW. The dynamic range is amazing! Should have brought my variable ND filter along to slow some of the water shots but otherwise it was very exciting.
Wednesday, July 24, 2013
Pioneer Day Raft and Run in Provo Canyon

I set out this morning to take some video and photos of the the first ever Pioneer Day Raft and Run in Provo Utah! You can see all about the race here. The race began at Canyon Glen Park (Provo Canyon) with buses taking participants in buses to the upper Provo river. Teams of eight to twelve ran the river with a raft guide to steer. I got to meet Dave, the organizer of the event and some of the volunteers, all great people who were very helpful and friendly. I hope you enjoy the video Dave. Make sure you watch the HD 1080 version.
After the rafting race, each team had to run a 5k down the canyon from Vivian Park. I was able to catch most of the competitors coming out of the water, and then starting down the canyon. The race ended up at Canyon Glen park and I got to shoot the Quadcopter at the finish line at the end of the run. It was a bit windy and the canyons always hinder the GPS signal so I didn't go very crazy with it.
It was fun to see people having such a good time. A couple of friends of ours came in first for best costume! Congrats to Tina and the Rootin' Tootin' girls.
Tuesday, July 23, 2013
Bridal Veil falls flying high with the DJI Phantom Zenmuse H3-2D gimbal
Hi all. Enjoy the flight around Bridal Veil Falls using the brand new Zenmuse H3-2D Gimbal attached to the DJI Phantom Quadcopter. Thanks to my awesome daughter who let me follow her around for some great shots.
It was a bit windy and the canyon makes for some interesting flying in GPS mode. I decided to shoot with the GoPro in 2.7K mode with Protune turned on. Officially, this is my second flight with the gimbal attached... I did a test flight last night in my neighborhood at about 11:30, my new neighbors are probably going to regret moving in. I didn't quite have the daring ability to go all the way up the falls. It scares me a lot to be flying over water even though I have never had a single hiccup with this thing.
The cost of being on the bleeding edge of technology sometimes pays off.
If I can get enough practice in, and feel comfortable with it, I am hoping to make a trip to Yellowstone and southern Utah for some amazzzzing footage. Cheers.
Sunday, July 21, 2013
Audio Technica PRO88W-830-24 battery powered wireless transmitter and receiver in-depth review
Audio Technica PRO88W-830-24 Pro 88W Wireless Microphone
So you are thinking about wireless audio options for Canon DSLR
Reasons that I thought about buying…
So if you have watched my review on Zoom H4N, you know that using a separate Audio recorder is probably the way to go for capturing high quality audio. The next problem that I ran into is being able to record audio from a distance without running a wire and carrying around a microphone. The main things that I needed were the ability to run on batteries and keep the weight down as low as possible. I looked at the options with Sennheiser and some of other lower cost options. As you can tell from my other reviews. I tend to try and save as much money as I can. I want the quality and features but at the lowest cost. Even though I read several reviews on this product, I thought that for my needs, it would work out.
Here is what I actually use it for.....
I found that for interview and training types of videos, I use this as the main input for mic'ing and ultimately sending the audio into my Zoom H4N. If I want the flexibility of moving around, without moving a mic, I use this a lot. I will typically mount the zoom on top of the hot shoe on top of the camera and then mount the receiver to the bottom of the Zoom. This doesn't cover all things and the one area that I am lacking is news interview style where I use a lav mic for myself and a handheld for people I want to interview. Because of this, I haven't done any of this style of interviewing. Just as well because it really requires multiple people for a camera man and talent. I did my research to compare multiple systems and although the Audio-Technica is not the best, the distance that I typically shoot works alright.
Here are the things I didn't expect or didn't like...
I didn't expect the audio quality to be great, but I didn't expect the level of noise that is introduced because of the radio signal. I also didn't expect the level of radio interference that can happen at really short distances. Computer equipment, some lights, cell phones, all of these things can disrupt the signal. And not having the option to change the signal beyond an A/B switch is not enough to get to the best possible clear signal. I have found that when I shoot around lots of computer equipment, cell phones, walls, and other interference, I have to test and move the position of the receiver a lot. This is not a fun process. I typically have to be within a few feet in order to keep the signal from being static ee. In open air though, across 30 feet, it does pretty well.
Here are the super cool things that I love about it...
I love not being tethered to the camera, once I find the right (non-interference spot), turning on all the signal chain and the camera and then knowing that it will work. I haven't had any problems with cables, or even the mic, although I haven't ever stretched to any heat or cold limitations. The batteries last quite a while, several hours, without worry. Just don't forget to turn it off. For the price, it was a good purchase. For the amount of headache of checking for interference, and doing takes that end up screwed up because of signal interference, I can't really recommend this product. If you want rock solid and flexibility, it looks like spending the extra money is well worth it. I will be upgrading to a the Sennheiser system for the future.
Common settings that I use...
Only has an A/B switch for channels
Levels can be adjusted but I never have from out of the box.
Friday, July 12, 2013
Wacom Cintiq 24HD Touch in-depth review
So you are thinking about buying Wacom Cintiq 24HD Touch
Reasons that I thought about buying… As a long time lover of the Wacom products, I had quite a history with using their products. I had a serial 9x11 (and for those of you that don't know what serial was, there use to be serial and parallel interfaces in computers of old, is has since been replaced by USB and the like) So I had a tablet to draw with clear back in the 1990's. I bought the original Painter (in a paint can, no less). I have always liked the idea of having a pen to be able to sketch and draw and paint with a digital interface. Chances are that the thought of using both the analog of a drawing pen with the latest advancements in the digital realm. If you know about me from my bio, you know that my primary profession is designing software interfaces. This usually involves a very large amount of drawing. About 6 years ago, I convinced my boss to let me get a Cintiq 21UX for work. If you are looking at the Cintiq 24HD Touch, chances are that you are already a digital artist of some sort, or want to be. When the announcement came of the 24HD, I got really excited about the added capabilities, with the extended full HD resolution. For a while now, trying to do digital whiteboarding, using a HD projector with the Cintiq 21, was a pain. So I thought that moving to a full 1920x1200 resolution would enhance this greatly. Probably my main excitement came from the enhanced ergonomics of being able to pull the drawing surface closer to me. Drawing on the 21UX was alright, but trying to keep a keyboard close by, and draw made for a sore back most of the time. To my surprise, Wacom announced a Touch version of the same 24 HD. To me, this was going to remove the need for keeping an external keyboard nearby. I watched several of the marketing videos that showed "beta" software that made this thing really sing. I had to have one.
Here is what I actually use it for..... So my primary uses were going to be, drawing user interfaces, mostly in Photoshop, and photo retouching in Lightroom and painting in Painter 12 on my personal time. So I use this to draw, edit, prototype, and share what I am drawing by hooking to a HD projector and mirroring the Cintiq display on the projector. I started with Windows 7 Enterprise Edition and most of the features that were demoed in "beta" software, were released by the time I got the Cintiq. While it wan't perfect, like how Painter would stop being able to touch the tools menu bar, even though multi-touch zoom and rotate would continue to work, it was awesome. Photoshop had it's own strange-ness with using touch features to zoom and rotate, but it too was very cool. Being able to see what you are drawing and touching right on the screen as you draw it, is amazing. Especially when you switch between a pencil, to a pen, to a brush, to selection tools, it is awesome. As a monitor, the color reproduction is also much improved over the 21UX.
Here are the things I didn't expect or didn't likeWow, where to start. So I thought that software updates would fix all the annoying bugs that seem to happen in the initial release. I upgraded both the Wacom drivers and other software like Adobe Photoshop as soon as they were released. This was the worst experience that I have had with any piece of software. I am not one to complain about buggy software, because I know the nature of software because I write software. It is rarely perfect. But when every update actually made things worst, or kept things the same, I went from annoyed, to livid over the course of several months. I updated to Windows 8, thinking that maybe these products were being tested in a different environment than I might be using -- no such luck. So without taking you through the process, today, almost a year after the release of this product, it doesn't work even as well as it did the first day. I actually did an unboxing and a review of the product when I got it, and showed features that don't work now. As far as I can tell, Adobe pulled out of being able to support some of the basic features of this touch and pen enablement. So, for most people, this means that using their primary software choice, Adobe Photoshop, requires the touch feature to be turned off. This wouldn't be so bad accept for the fact that it kinda worked before, as it was a selling point in the marketing material. It was very strange to watch how Wacom had remove marketing material and place "disclaimers" on their website saying that Adobe didn't support touch features. It also wouldn't be as bad if the touch version was a few hundred dollars difference. But it's not, it's 1000 + more for the touch version.
I do not think that knowing what I know now, that having the touch version is worth the trouble and heartache that I have had over this past year. My disclaimer for this is that Adobe might come around an do a update tomorrow and make it all better. The testing teams of both Wacom and Adobe should be ashamed of themselves. They let a marketing and sales teams push through a product that wasn't ready. Shame on them. Shame on Adobe for not recognizing this trend and having a touch ready product with the release of Windows 8. This was the primary reason that most people bought a Windows 8 tablet and if they did, they are frustrated trying to learn some other drawing program and product. I can understand not doing an RT version, but are you really going to ignore the potential market of Touch and Pen combination that would have been huge.
I spent a huge amount of time trying to get a Touch Keyboard that would work well. I found the Windows 7 virtual keyboard to be useful, but without enough flexibility to really use it to replace a hardware keyboard. The Windows 8 touch keyboard is better in some areas, but much much worse as a replacement keyboard, as it is designed for tablet devices and not desktop screens. I will probably do a full review just on the state of the virtual keyboard world.
Here are the super cool things that I love about itSo, with all that said, and ignoring touch features for a moment. The pen interface (even though there have been problems with certain pens and programs) for me, it has worked very well. Like I said before, the color and brightness and the texture of the screen are all great. The touch ring and programmable buttons are all so much better and very useful. I love the multi-touch added capabilities that are also programable. Being able to position the screen at an angle to prevent back ache makes things so much more comfortable. Too bad I have to turn off touch and still position a keyboard within reach.
I am so utterly disappointed with this product. It is like having something that is a dream come true, but, when you get it, it is all smoke and mirrors. I have to say that there was a large stretch of time that I just didn't use it. I used the old fall back of just a mouse and keyboard. That was just sad times.
There may come a day when Wacom and Adobe get back together to give creative professionals the best experience that money can buy - who knows, it could be next month, next year, or maybe never. Right now, there is NO REASON to buy the Touch version unless you are a gluten for punishment. Wait till they figure out what the hell they are doing.
Settings that I use all the time…
Custom settings for buttons for applications
Multiple monitor setup and projector mirroring
Cakewalk Sonar X2 with update for touch (Win8 only but still very cool)
Wednesday, July 10, 2013
Swivi 5.6 External Monitor for DSLR in-depth review
So you are thinking about buying a Swivi 5.6 external monitor for your DSLR Camera?
Reasons that I thought about buying…
If you have watched my review on the Canon 7D or the Canon 5D Mark III, you know that one of the hard things about using a DSLR for video is focus. I went down the path of getting a viewfinder that attaches to the back of the camera in my review of my viewfinder. With that review, I also talked about how it exposed the quality of the LCD quickly becomes the issue of being able to really see focus. I also found that watching things back on the same small 3 inch LCD. especially when I was trying to share the video with those around me became a huge issue. So for shooting things that I wanted the ability to see focus, as well as play things back, I needed something that would be large enough and of course battery operated. Along came the Swivi... I read several reviews of people who got pre-release over at Cheesycam and Oliviatech who liked what they were seeing. I also found the price to be within reach. Honestly at the time, I didn't understand focus peaking but it seemed like this would be something that would come in very handy. It really really did make a huge difference to be able to see where the focus really was.
Here is what I actually use it for.....
I have found that this is very useful for almost every situation shooting video. The Swivi attaches to the camera mount at the bottom of the camera and swivels either to the side or just overlays the back of the camera. I found the resolution to be a huge jump from the LCD of the back of the 7D. When I take it out in public, people tend to be in awe of it, and other photographers tend to be jealous of it. The monitor sun hood comes in very handy when trying to deal with blocking the sun. Obviously, this is not an super bright LCD or OLED screen, so being able to see in direct sunlight is a must. Also being able to attach the sunhood in either direction gives some great flexibility. It is plastic so the durability is worry some. I have been very careful with being hard on it. I have always left it behind when shooting on hiking shoots. The focus peaking that is built into the monitor is pretty good. I have seen other high end monitors that do a much better job, but it is very useable. Indoor shots are usually the ones where I use it the most.
Here are the things I didn't expect or didn't like
So probably the biggest problem that I have had is getting it to stay tightly connected and not swivel when attached to the camera. The wheel that allows you to screw to the mount at the bottom of the camera takes a lot of force to get a tight enough fit to really stay put. I have found that pulling the right edge up against the camera is the only way to really make it not swivel on the 7D. For what ever reason, this didn't seem to be the case with the 5D Mark III. The other strange thing that I noticed is that if I leave a battery in, which it takes the same LP-6 (the video says EP-6, whoops) Canon battery as the camera, it will actually drain the battery within a day or so. Even if the monitor is not turned on, it seems to suck battery power. My fix for this is to always place the battery that I am using in upside down when not in use. This way it doesn't drain the battery. The power button is a little strange as well. Turning it off takes holding it down for a full second or two before it powers off.
The color reproduction is good. Good enough that I rarely find enough color difference between the back of the camera and the monitor, although there is some. Brightness is good as long as you are not in direct sunlight. The sunhood helps but it isn't quite enough to really see well in that much sun. Sunsets work well though. Bootup time isn't great. It does take a while before the camera recognizes the signal and switches to the monitor. Some of that is the camera though. It has a button that allows it to go full frame or cropped. It is mostly useless on the 7D. The menu and rocker wheel to select and modify settings like brightness and contrast works well enough. Swiveling the monitor feels like you might break it off. The fact that it is made of plastic makes it feel cheap but as long as you don't twist it the wrong way, you should be fine. When it is not rotated, and even when it is, access to the buttons on the left side of the screen are hard to get to. But, access to the scroll wheel on the right is. So recording is easy, but playing back is not because the play button is on the left side.
Here are the super cool things that I love about it
I have to say that it was really nice to be able to see a level of detail that I could not see just looking at the back of the camera. The resolution bump from the LCD of the back of the camera to this monitor is enough that it adds a huge value. Having the focus peaking available, at least before Magic Lantern started working on a 7D, was worth the money alone. For the price, this was a great addition that allowed me to step up to a level of cinematography that I expected. The fact that it uses the same batteries for me was a huge plus. It meant that all my power options were sharing the same type, so in a pinch, I could swap things around if needed.
I like the ease of mounting and the cable that is rotate-able to prevent it from getting messed up by rubbing or pushed sideways. I have also gotten several adapters and a longer HDMI cable to be able to mount on a jib/crane away from the camera. Although it doesn't help with being able to remotely focus the camera, it does help to be able to see the shot as you are shooting from the back of the crane.
Let me know what you think. Send a comment.
Zoom H4N in-depth review
So you are thinking about getting an audio recorder for Canon DSLR with the Zoom H4N
Reasons that I thought about buying…
So if you have watched my review on Canon 7D here, you know that using the on-camera mic is not great. I knew that I needed to add-on to the camera to allow for better audio recording. I read review after review of people discussing an on-camera mic, but I really wanted the added flexibility of multiple channels of audio. I wanted to be able to plug-in multiple mic's for field recording and I wanted it to be simple. Funny story, I actually got my wife to agree to getting it because she was a big fan of Ghost hunting. I told her that she could use it as a great EVP recorder. Turns out, it's a horrible EVP recorder, because of it's high quality, the chances of "interference" causing "unknown" sounds to be recorded is pretty low. That being said, the Zoom H4N has become the de-facto standard of off camera audio recording. There are many imitators out there, and even Zoom is trying to up-sell people to the new Zoom H6N that is about to be released. But the abilities of this little recorder make it flexible enough to do just about anything.
Here is what I actually use it for.....
I use this as the main input for mic'ing and ultimately sending the audio into my camera. The nice part of this is that I can record multiple mic inputs at the same time either on multiple channels or just from the x/y stereo mic on the zoom. I will typically mount the zoom on top of the hot shoe on top of the camera if I am running and gunning or shooting an event like sports or concert type events. It captures the stereo field rather nicely, and also has the ability to set limiting and compression for those moments that you want the maximum audio signal that you can. In more advanced setups for interviews or training videos I usually run a separate condenser mic in order to get closer to the subject. Originally, even though you could have this as a recorder, plugging into the Canon 7D directly out of the Zoom required a intermediate device or cable in order to cancel out the AGC from the 7D. I bought a JuicedLink device to have the signal on half of the stereo channel to max out in order to allow the signal be controlled on one channel. Now with the latest 2.0 firmware for the 7D, you just need to set the levels in the camera to Manual and then make sure the levels in the camera are set to not peak, and in the Zoom both the record level and the headphone out level so that the camera does not peak out anywhere along the audio chain.
Here are the things I didn't expect or didn't like...
Learning the menu system and learning the different options in the Zoom can take some time. Recording multiple inputs at the same time with multiple mic's can be a bit tricky. The Zoom also has updated the firmware to allow for setting input levels while recording multiple sources. I highly recommend updating if you want to do multiple mic setups. The biggest surprise was when I accidentally tipped my camera bag over into a river at the top of a waterfall. The Zoom went off the 100 foot waterfall and survived the fall, not even a scratch on it. I did the bury it in rice for a couple of days trick to get the water out. And to my surprise, it worked. Even the microphones sound no worse for wear. I have used the Zoom in meetings, concerts, interviews, and in cold and hot weather. It just works. I haven't come across any flaws that I can find. The only thing that I had to do is get a fuzzy wind screen. The foam screen that comes with it doesn't help with wind. When shooting with the camera I typically don't even record on the Zoom, I just turn on Monitoring (in settings) and go directly into the camera. If you want to monitor with headphones, then you need a splitter cable for coming out the headphone out.
Here are the super cool things that I love about it...
If you are going to get serious about shooting video with a DSLR, you are going to need some way to get quality audio with the video. The Zoom makes this possible with a portable, quality audio, at 24bit 96Khz. I love my Zoom and would replace it immediately if it ever got lost or broke. Because it is so portable, and the battery life is very good -- about 4-6 hours of continuous recording, taking on a shoot is a no-brainer. I am going to look seriously at the Zoom H6N. The added flexibility for the 6 channels and the different on-board mic options is a very nice set of added features. I would highly recommend this piece of equipment for anyone trying out film-making. It has about every feature you could ever want from a portable and high quality audio reproduction.
Common settings that I use...
Record Settings, 24 bit WAV, mp3 variable
Input Monitoring On
Record levels
Headphone out levels
Camera settings Manual levels
Multiple microphones attached
Tuesday, July 9, 2013
Canon 7D in-depth review
So you are thinking about buying Canon 7D?

Reasons that I thought about buying…
Canon is a strong brand. I had a Canon film camera and I also bought a Canon T2i (now upgraded to a T3i) years ago when I got back into shooting. I had friends who got the Canon 5D Mark II (now upgraded to a Mark III) and I wanted one. The things that were really important to me were the mega pixels, and the ability to shoot video. The pictures per second, the crop factor…although there were benefits, I didn't really understand them fully at the time. I also knew that the camera needed good lenses, and I couldn't afford both the 5D and some good lenses. I knew that I wanted high quality glass, probably a 24-70 2.8 and a 50mm 1.4. My main focus was going to be shooting stock photography of common things. I knew that I wanted to shoot some landscapes and shoot portraits. For video I also wanted to shoot stock video of locations and people. And of course, I wanted to capture all the school activities and cheerleading of my girls.
Here is what I actually use it for.....
I started down the path of shooting stock photos. After getting into it, and shooting several things, I found that there are a lot of rules about shooting stock photos. And this is a club that other photographers do not necessarily want new members. This is pretty typical though. I shot outdoor landscapes and took it to shoot cheer competitions. I had shot with a Sony HD Camcorder in the past which always left me frustrated with the quality of the picture. I bought the Canon 50mm 1.4 lens first, thinking that the light sensitivity would allow me to get more great shots even in poor indoor lighting. The camera with this lens, performed really well in low light, but shooting outdoor landscapes with a lot of light did not give me the flexibility that I thought it would. And the inside cheerleading shots, while much higher quality than the Sony, forced me to have to pan back and forth even when sitting at the very top of the bleachers. I think the biggest problem for me, even now with DSLR shooting is focus. Getting focus to happen fast and accurate is an art form. It takes lots of practice and you need the right tools that I didn't originally have at the time. I have taken a lot of photos as well. I have used the on-camera flash for some of them. I liked the fact that this camera had a flash for those moments that you want to treat it like a point and shoot. Since I was determined to make good photos and good videos, the cheaper price on the camera allowed me to add more things to it later on. And with the firmware update that was released, some of the audio missing features are significantly better now. I have shot a lot with this camera. It has performed well even in extreme conditions. I have shot in brutal Utah cold, humid Oregon coast, hot southern Utah. I have never dropped it in water, unlike the zoom audio recorder and a flash, but it has gotten slightly wet at times.
Here are the things I didn't expect or didn't like...
The crop factor of the camera with the 50mm lens was narrow. I hadn't done the math to realize that 50mm meant it was really a 80mm lens. I didn't realize how much I would have to move back to shoot any people or things. Don't buy a fixed lens for your first lens. A lot of people really like the 28-104 f4. I bought a 24-70 2.8. It has been a great lens. Shooting photos in almost any condition with the a lens like this is great.
It took a lot of work to figure out how to best focus. If you get used to looking through the viewfinder with photos and setting focus, when you are in video mode, the viewfinder is obviously blocked by the mirror so you have to use the video screen to check focus. Doing this is almost impossible without digitally zooming in. Which means following and changing focus is impossible without adding other viewfinders or bigger screens, or magic lantern firmware on. There is no autofocus while recording unless you like your video to look weird while the lens searches for focus in the middle of a shot.
The on-camera mic is not bad if you don't care about quality audio. If you do care, you are going to have to get some sort of mic, or mic's to go with the camera. The AGC, or Automatic Gain Control, tries to get the most signal and compresses the sound to raise it to a level without clipping. For someone who just wants to shoot without worrying about the audio, this feature can come in handy. For someone who wants to get the best quality audio possible, not so much. If you upgrade to a mic, you will hear the difference.
One of the features that this camera has is micro focus adjustments. I found that my 24-70 lens wasn't tack sharp in a lot of my photos. At first I thought maybe it was camera shake or just me doing something wrong. After much research, I found that some combinations of cameras and lenses can be off just a bit when focusing. I used this feature to have the camera recognize this lens and automatically adjust the tiny amount required to get accurate focus. If you are going to be using lots of different lenses, this is a very helpful feature.
Moire patterns are something that I didn't really understand in video. Wow, do they become bad news. I shot a training video where I had a shirt with horizontal stripes. I was shocked when every subtle movement became a huge distraction. I went to my friend Google to find an answer. Turns out the only answer is to blur the crap out of the video - kinda pointless if you are trying for something sharp. Problem is, you don't really have any control of them, it's because of the sensor.
Here are the super cool things that I love about it...
If you are going to get serious about shooting video or photos with a DSLR, you can't go very wrong with any of the Canon's. While some have more features to enable you to extend things even further into some creative areas, the thing I have enjoyed about the 7D is it's modularity. I have been able to get into slowed waterfall types of shots, astrophotography, HDR photos, night time video, wireless audio, sports photography and sports video, multiple flash types and sizes for all types of shooting,.. the list goes on and on. The lenses that are available hit every price point and every feature. And glass doesn't lose value. There will always be upgrades, and more features that everyone has to have, if you can afford it. For me, this has been a great camera and a great bunch of shots.
Common Settings that I use and will add on to later videos
Picture Styles
AEB HDR photos
Audio Manual settings
Max ISO settings High noise reduction
Video record settings

Reasons that I thought about buying…
Canon is a strong brand. I had a Canon film camera and I also bought a Canon T2i (now upgraded to a T3i) years ago when I got back into shooting. I had friends who got the Canon 5D Mark II (now upgraded to a Mark III) and I wanted one. The things that were really important to me were the mega pixels, and the ability to shoot video. The pictures per second, the crop factor…although there were benefits, I didn't really understand them fully at the time. I also knew that the camera needed good lenses, and I couldn't afford both the 5D and some good lenses. I knew that I wanted high quality glass, probably a 24-70 2.8 and a 50mm 1.4. My main focus was going to be shooting stock photography of common things. I knew that I wanted to shoot some landscapes and shoot portraits. For video I also wanted to shoot stock video of locations and people. And of course, I wanted to capture all the school activities and cheerleading of my girls.
Here is what I actually use it for.....
I started down the path of shooting stock photos. After getting into it, and shooting several things, I found that there are a lot of rules about shooting stock photos. And this is a club that other photographers do not necessarily want new members. This is pretty typical though. I shot outdoor landscapes and took it to shoot cheer competitions. I had shot with a Sony HD Camcorder in the past which always left me frustrated with the quality of the picture. I bought the Canon 50mm 1.4 lens first, thinking that the light sensitivity would allow me to get more great shots even in poor indoor lighting. The camera with this lens, performed really well in low light, but shooting outdoor landscapes with a lot of light did not give me the flexibility that I thought it would. And the inside cheerleading shots, while much higher quality than the Sony, forced me to have to pan back and forth even when sitting at the very top of the bleachers. I think the biggest problem for me, even now with DSLR shooting is focus. Getting focus to happen fast and accurate is an art form. It takes lots of practice and you need the right tools that I didn't originally have at the time. I have taken a lot of photos as well. I have used the on-camera flash for some of them. I liked the fact that this camera had a flash for those moments that you want to treat it like a point and shoot. Since I was determined to make good photos and good videos, the cheaper price on the camera allowed me to add more things to it later on. And with the firmware update that was released, some of the audio missing features are significantly better now. I have shot a lot with this camera. It has performed well even in extreme conditions. I have shot in brutal Utah cold, humid Oregon coast, hot southern Utah. I have never dropped it in water, unlike the zoom audio recorder and a flash, but it has gotten slightly wet at times.
Here are the things I didn't expect or didn't like...
The crop factor of the camera with the 50mm lens was narrow. I hadn't done the math to realize that 50mm meant it was really a 80mm lens. I didn't realize how much I would have to move back to shoot any people or things. Don't buy a fixed lens for your first lens. A lot of people really like the 28-104 f4. I bought a 24-70 2.8. It has been a great lens. Shooting photos in almost any condition with the a lens like this is great.
It took a lot of work to figure out how to best focus. If you get used to looking through the viewfinder with photos and setting focus, when you are in video mode, the viewfinder is obviously blocked by the mirror so you have to use the video screen to check focus. Doing this is almost impossible without digitally zooming in. Which means following and changing focus is impossible without adding other viewfinders or bigger screens, or magic lantern firmware on. There is no autofocus while recording unless you like your video to look weird while the lens searches for focus in the middle of a shot.
The on-camera mic is not bad if you don't care about quality audio. If you do care, you are going to have to get some sort of mic, or mic's to go with the camera. The AGC, or Automatic Gain Control, tries to get the most signal and compresses the sound to raise it to a level without clipping. For someone who just wants to shoot without worrying about the audio, this feature can come in handy. For someone who wants to get the best quality audio possible, not so much. If you upgrade to a mic, you will hear the difference.
One of the features that this camera has is micro focus adjustments. I found that my 24-70 lens wasn't tack sharp in a lot of my photos. At first I thought maybe it was camera shake or just me doing something wrong. After much research, I found that some combinations of cameras and lenses can be off just a bit when focusing. I used this feature to have the camera recognize this lens and automatically adjust the tiny amount required to get accurate focus. If you are going to be using lots of different lenses, this is a very helpful feature.
Moire patterns are something that I didn't really understand in video. Wow, do they become bad news. I shot a training video where I had a shirt with horizontal stripes. I was shocked when every subtle movement became a huge distraction. I went to my friend Google to find an answer. Turns out the only answer is to blur the crap out of the video - kinda pointless if you are trying for something sharp. Problem is, you don't really have any control of them, it's because of the sensor.
Here are the super cool things that I love about it...
If you are going to get serious about shooting video or photos with a DSLR, you can't go very wrong with any of the Canon's. While some have more features to enable you to extend things even further into some creative areas, the thing I have enjoyed about the 7D is it's modularity. I have been able to get into slowed waterfall types of shots, astrophotography, HDR photos, night time video, wireless audio, sports photography and sports video, multiple flash types and sizes for all types of shooting,.. the list goes on and on. The lenses that are available hit every price point and every feature. And glass doesn't lose value. There will always be upgrades, and more features that everyone has to have, if you can afford it. For me, this has been a great camera and a great bunch of shots.
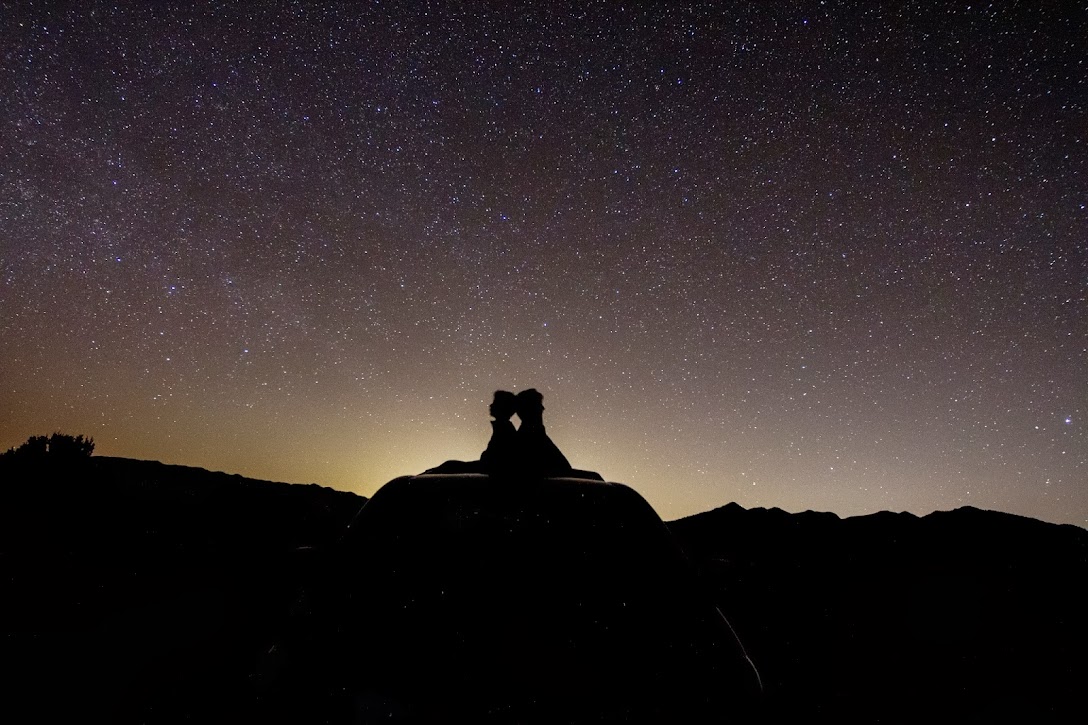
Common Settings that I use and will add on to later videos
Picture Styles
AEB HDR photos
Audio Manual settings
Max ISO settings High noise reduction
Video record settings
Subscribe to:
Posts (Atom)